

The day is here, friends! After lots of vision boards, Insta-story teases, and this Renovation Part I blog post, the peony garden nursery renovation is finally complete!
The Beginning:
As Julie Andrews would say, “let’s start at the very beginning - a very good place to start”. Back in 2013, my husband and I bought a newly renovated 1969 ranch. This neutral “move-in ready” (haha!) house provided the perfect blank slate in each space to design our happy, color-infused home, and after 6 years, I think we are finally almost done tweaking it. Maybe? Then again, I get bored easily, so we’ll see! The bedroom turned office turned nursery started out like this:


They’re horribly grainy photos from back when the iPhone 11 didn’t exist, and phones didn’t take professional grade photos, but you get the point!
The Office Transformation:
A few months later, I launched Fuchsia Design, and I spent two years working in this bedroom building my business until I was ready to grow my team and move into my first brick and mortar space.
In the meantime, we created this peaceful office space complete with a blush pink ceiling, crown molding, crystal chandelier, built in desk, brass accents, striped walls, velvet chairs, and a whole lot of happy. I really loved working in this room every day, and for two years it suited me well.


After I moved into my brick and mortar office space in 2016, the room pretty much sat untouched and rarely used in the corner of our home. So, when we decided to add 10 new little fingers to our family, it was a no brainer to let my beautiful office go and convert it into the nursery of my dreams.
Now - MOST people would look at this office and think, this is perfect for a little girl’s nursery! Baby pink ceiling, striped walls, and brass accents - what more could you want? I looked at the space and said - everything must go. The trim? Rip it out. The walls? Cover them. The doors? We need new ones. It’s possible I lost my mind, but my husband has realized over the past 9 years that I do everything for a reason, so he trusted the vision and onward we pressed. For a look into the first few stages of the renovation including the development of the design board and the huge trim upgrades, check out Part I of the renovation series here.
But, how could I forget? You’re a die-hard Fuchsia Design fan, and you’ve obviously already read that blog post, so let’s move on to what the space looks like now! Here’s the inspiration board I put together at the beginning of the renovation. The wallpaper from The Artwerks provided most of the creative direction for the entire space.

The Big Nursery Reveal:
And without further ado, here’s the colorful and cheery nursery now:


This little lady in the chair is anxiously awaiting for her world to be rocked. (no chair pun intended) She knows something is up, so let’s hope the transition goes well in December!

She’s not even born yet, and her bow collection on the back of the door has already exceed 50. Oops!

Throughout my career, I’ve come to realize that some rooms photograph like a dream, and sometimes photos don’t do a room justice. As my husband said, “walking into this room is an experience”, and it’s one that can’t fully be captured in images. Yes, we could have easily (and much less expensively) done an accent wall of wallpaper instead of ALL the walls, but an accent wall says, “an interior designer designed this”, while a space fully engulfed in floral print says, “an interior designer lives here”. Sometimes, you just have to go for it! Aside from the room being beautiful and dramatic, I wanted it to function well, and while I’ve never had a baby myself, I have the benefit of having designed nurseries and kid spaces throughout the past 10 years, so I took that experience and applied it to my own home.
CLOSET STORAGE:
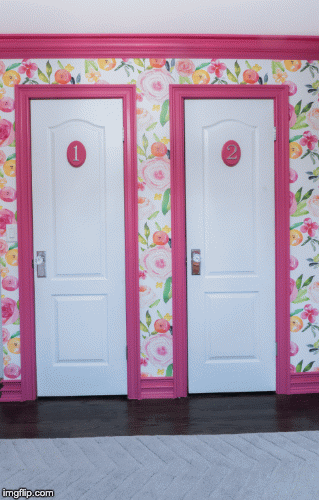
First, let’s talk about closet storage. The room is a bit quirky in that it has two small side-by-side closets rather than one big one. So, what’s behind door #1? (I love these number plaques. It kind of makes them feel like dressing room doors!). Inside closet #1, we built a tower of shelving for canvas storage bins. Right now, each bin holds a different sized clothing (3-6 months, 9-12 months, etc), so as she grows we can easily rotate out the new sizes and see what we have in each size. Then, we keep her more delicate current-sized items hung.
WALLPAPER:
Equally important, is the closet wallpaper because no detail is too small, and no space is too ‘unimportant’. Mary-Catheryn from Copper Corners Art is a super talented local artist, and I love that I was able to incorporate her wallpaper ‘Sunny’ into the closets and shelving (flanking the crib). While we had the floral wallpaper professionally installed, we tackled this pre-pasted wallpaper on our own, and it was super easy to install!

And - what’s in closet #2 you ask? Well, it may just be the smartest thing I’ve ever designed. Being that we plan to bottle feed our babe, making bottles (especially in the middle of the night) is not the most convenient… until now! We planned ahead by incorporating an outlet inside the closet. Then, my husband built in drawers for bottle and formula storage and a countertop to hold our Baby Brezza, bottle drying rack, and a gallon of water for refills. We also incorporated dim LED lighting for the middle of the night feedings.

Lights on! Lights off!

Don’t you just love that closet wallpaper!?
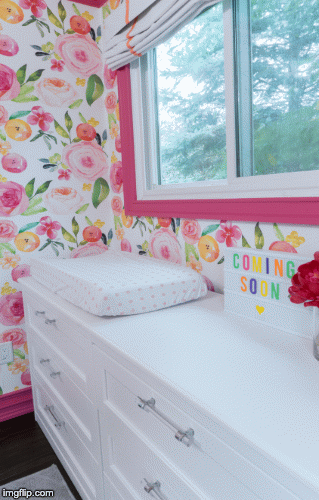
CHANGING STATION:
Adjacent to the bottle making station is the dresser/changing station. We decided to go with this standard dresser (that she can easily use as she grows up), and added a changing station to the top. I like that it has two rows of drawers so I can stand in front of one row, and still easily open the top drawer on the other side to access diapers and wipes.
FURNITURE HARDWARE:
I wasn’t a fan of the drawer hardware that came with the dresser, so I swapped it out for chrome and acrylic pulls instead. Adding new hardware is the perfect way to elevate furniture, so here’s the hardware we used for the dresser, the closet built-in drawers, the nightstand pulls, and the crystal closet knobs.


I love that I was able to incorporate this peach nightstand into the design. It’s one of the first pieces of furniture I ever bought myself (back in college), and at the time it was black. Then, it was painted pale pink for my office, and now it’s refinished in peach for my little lady’s room.
ARTWORK:
I was also very excited about adding some of Meredith Wing’s amazing artwork. I’ve followed Meredith (in a 2019 non-creepy, social media way) for many years, and I admire her creativity greatly. With such a busy wallpaper, selecting artwork was a bit of a challenge, but I love that her pieces tie in the floral theme, and the wide, white matte and frame offset them from the busy wallpaper allowing them to shine on their own.

ROCKER/RECLINER:
I also had a hefty order when it came to a nursery chair as I wanted one that swiveled, rocked, reclined, had high enough arms to rest elbows on, and had winged sides to rest a head against. I also wanted it to be in a durable fabric, and this performance velvet rocker checked all of my boxes!
WINDOW TREATMENTS:
For window treatments, we opted to have custom blackout roman shades made; I liked the idea of romans over drapery panels because she could easily try to pull herself up using drapery panels and risk having them fall on her.
RUG:
Here’s a link to the amazingly soft chevron rug. I liked that it had a tone on tone pattern, so it didn’t compete with the wallpaper, but was more visually interesting than a plain solid rug.


CRIB:
And finally, here’s a link to the Jenny Lind crib we used.
And because side-by-sides are fun, here’s a few:


And that’s that. The nursery is a wrap, and we’re officially ready for our little lady to arrive early December. This room is so special, and I’m grateful to my husband for his trust in my vision (not many husbands would agree to fuchsia trim and wall-to-wall floral wallpaper!), his hard work, and for nodding and smiling at all of the expenses and investments that went into the room. I hope it’s a room that brings our daughter as much happiness as it brings me.

*Some safety notes answered:
Shelving and dressers are anchored to the wall.
The crib won’t actually have the pillow and bunny in it when she’s sleeping.
The mirror above the crib is anchored to the wall
Yes, we’re bottle feeding our babe as we decided that’s what’s best for our family. No - you can’t convince me otherwise <3